
More than anything else, potential patients will focus on just two things to decide whether to see you or another provider entirely:
- Your Google ratings and reviews.
- Your Before & After Photos (BAPs).
Before-and-after photos and videos are a make-or-break of an aesthetic practice.
All of the branding and beautiful websites in the world won’t fix bad results.
But that’s rarely the actual problem.
It’s usually bad lighting and photography failures that hurt even the best results.
And that’s what many providers suffer from. After all, they’re surgeons, not portrait photographers.
So here’s how to start taking before-and-after photos that put your patients in the best light possible.
0. Don’t Underestimate the Organization Required
Before covering tips and the technical aspects of photography, we’ll let you know that one of the most common failure points in before and after photos has nothing to do with lighting or focal length: It’s underestimating the amount of internal organization needed to pull off consistently consistent photos.
You want a tripod and some inexpensive lights always ready to go and never going anywhere, since your before shots have to match your after shots exactly.
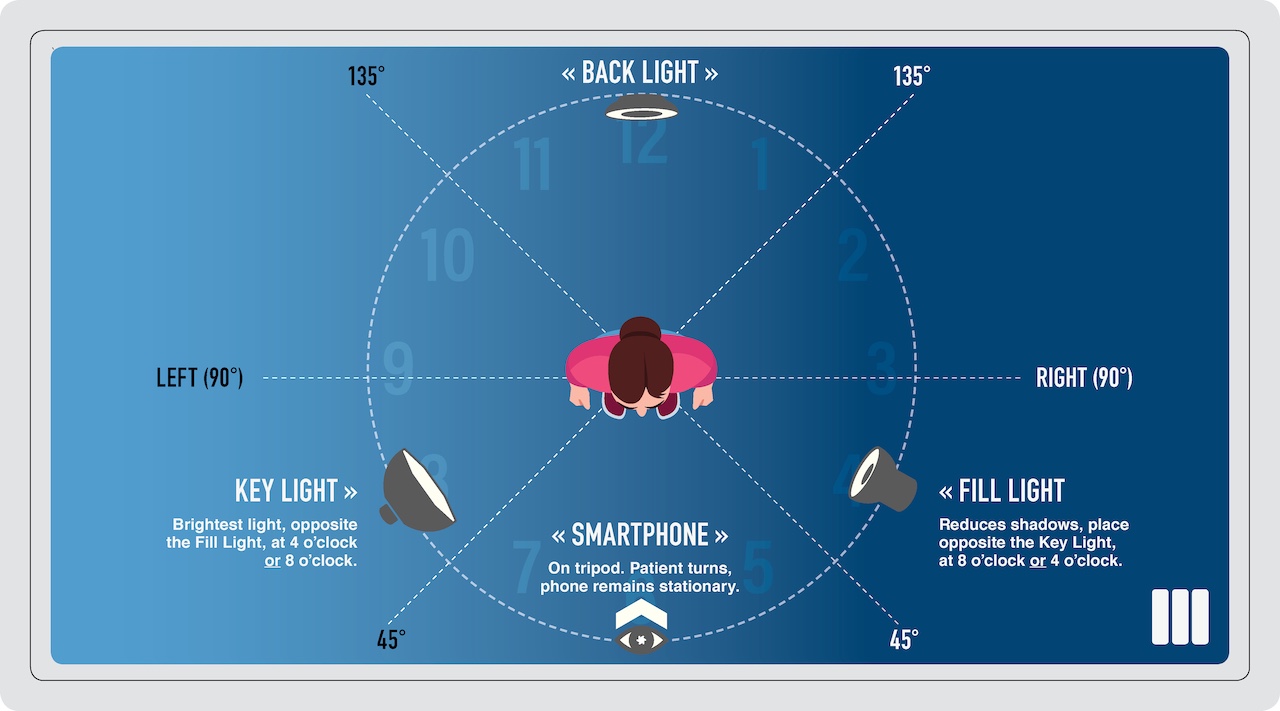
So step one should be investing in some degree of establishment—usually a lot of time and a little bit of money. Things like Consent and Release Forms, Lines for Patient Photo Scheduling, a Simple Lighting Set Up (“three-point lighting,” illustrated below, is considered best), a dedicated “Set” for all of your photos, and a Checklist of Camera Settings.
1. Consistency Is Everything
Use the same room, camera, lighting, background, and patient positioning for every set of photos. Inconsistencies will distract from your results and, even worse, diminish your credibility, because viewers' attention is caught up by changes in expression or tone, or better lighting in the “after” series of shots for example. Create a dedicated photo area in your practice to make this repeatable and easy. Keep your photography set up, camera angles, eye level, and lighting the same in every shot, and, if you can, get your patients to dress the same in both series of photos.
2. Use a Neutral Background
A solid-colored backdrop—gray or blue tends to look best—focuses attention on your patient. A concrete wall or other non-reflective surface is also workable. Avoid clutter and distraction. If your background has to be some part of your office, be sure that no beams or wall corners sit directly behind your patient.
3. Invest in Inexpensive Lighting
Natural light will vary greatly throughout the day and especially on different days, so use some form of controlled, studio-style lighting. A ring light or simple softbox setup is best for evenly lighting your patient. Harsh overhead lighting, like ceiling lights, amplifies wrinkles. If you lack professional lighting, it’s well worth the small investment, but have your patient sit in front of a sheerly curtained window in the meantime. As for camera or smartphone flashes, you should never use them.
4. Use a Smartphone Camera
You don’t need a “DSLR” for these photos. An iPhone, Android, or Google Pixel will work perfectly. But, you must avoid any “cinematic” camera settings, and you must keep your focus and zoom set in stone from picture to picture. You can’t take your before images with a 2X zoom from 12 feet away and then take your after images with a 1X zoom from 6 feet away—both are different lenses, with different outcomes. Some of these errors are made by accident, but patients and other viewers don’t give you much room for explanation. They simply want before and afters that are consistent with each other. Makeup in one and not the other is an obvious no. “Bokeh” backgrounds (that’s where you see halos of light) and cinematic camera effects are also very bad for these specific shots.
5. Use Standard Patient Poses
Create a simple list of standard poses: front view, side view, and ¾ angles are the most common. Have patients stand or sit the same way in both before and after images. You can put masking tape markers on the floor to help keep your patients’ and camera’s positioning consistent, and a bar stool style chair will help eliminate slouching.
Ultimately, between your background, lighting, and patient positioning, you’ll want to make all decisions against “What focuses attention on our patient’s results?” So these are simple shots, but great lighting and some creativity are perfectly acceptable as long as they’re consistent in both series of shots.
6. Bring “Before” Photos to Your “After” Photoshoots
Before a patient comes in for their “after” photos, print out or pull up their “before” photos to help guide both you and the patient in reduplicating their positions, facial expression (which should be mostly neutral in both photo series), and chin angles. As providers, we know that even seemingly small things like raising the chin slightly or pressing the tongue to the roof of the mouth alters the shape of the neck and lower face—and we have to actively avoid that in these images.
7. Don’t Filter, Don’t Edit.
What you see has to be what you get—literally. SnapChat filters, Instagram filters, Photoshop, and any other editing tool that alters the appearance of your results is obviously a very bad idea. Patients expect honesty and transparency, and surgeons who resort to filters often do so, if we’re being charitable, because they can’t master lighting. You’ll want nothing to do with the rise of misleading before-and-after shots, which means avoiding even accidental lighting, focus, or camera angle changes.
8. Time Your Photos
Only take “after” photos when results are visible and swelling has subsided. Rushing to show results too soon can misrepresent key outcomes and skew expectations. For lower body work, taking “after” images while your patient is still on the OR table is dishonest and, as far as photos go, there’s little worse you can do to destroy your professional credibility. For dermal fillers, taking “after” images immediately after the procedure is likewise not smart or honest, because that pretty pout will wither in a few hours, as it should.
9. Keep Expressions Natural
Ask patients to maintain a neutral facial expression and a relaxed posture in both images. Smiles or dramatic facial expressions in after photos can unintentionally influence how the results are perceived.
10. Use the Same Framing and Zoom Level
The framing of your photos should remain identical from before to after—no cropping or zooming in on one and not the other. Consistency avoids any sense of manipulation and improves credibility. Floor markings will help you keep your tripod, patient, and lighting in exactly the same places.
11. Label Photos Clearly
Add clear “Before” and “After” labels to each image, along with how long after treatment the “after” photo was taken, whether on the image itself or in text captions. This improves clarity and helps manage patient expectations.
12. Shoot Video at the Same Time, if You Can
Short video testimonials add authenticity to your patient’s transformations. They’re ideal for social media and far better than still images. The best of these clips tend to be where the patient is still and silent, with the surgeon “panning the camera” slightly, and then adding a voiceover that explains what procedure was done when. If patients are comfortable doing so, they can also talk or turn to show various angles of the work done. In these videos, a provider’s gloved hands show respect for your patient and viewers, and add a professional air, particularly if hands will come into contact with the patient’s body.
And if you’re not yet set up for video, don’t let that stop you from taking still images.
Key Takeaways to Keep Top of Mind
- Reviews, ratings, and before-and-after photos are a vital marketing and clinical asset.
- There’s nothing wrong with flattering before-and-after photos, but everything wrong with altered or enhanced before and afters.
- Take your before and your after photos under the exact same conditions and settings: Duplicate lighting, duplicate angles, and the same camera placements and patient positions.
- It is professionally acceptable to build up an in-house video team, and/or an in house social media team.
- It is professionally acceptable to get creative with a patient’s results. But standard before and after images have their own professional criteria and patient expectations.
- It is professionally unacceptable to alter, edit, or dramatize before-and-after images, or to take these photos under different conditions. The #1 key to this is changing nothing between your “before” and “after” photography, lighting, and camera set up.
- The best lighting set up for before and after photos is “three-point lighting.” This places your camera or iPhone at 6 o’clock, your brightest light (called a keylight or key) at 4 or 8 o’clock, your fill light at 4 o’clock, and your backlight somewhere between 12 and 2 o’clock. Of the three, a back light (also known as a hair light) is least important.
Before & After Images are Make-Break for Board-Certified Plastic Surgeons
We live in a visually-driven digital landscape, where few things are more compelling to potential patients than honest, high-quality before and after photos.
They tell a story of transformation, showcase your expertise, and build or break trust before even an in-person consult.
But not all before-and-after photos are taken equally.
Lighting, angles, backgrounds, and consistency all play a role in how your results are perceived.
At Studio III Marketing, we’ve worked with hundreds of top-tier plastic surgeons and med spas.
We specialize in crafting custom digital strategies for elite plastic surgery and aesthetics practices.
From photo galleries to full-funnel campaigns, we’ve got you covered.
